My Scrappy Valentine - Tutorial


For my daughter's first Valentines day, 11 years ago, I decided to make little fabric Valentine books for her and my husband. They turned out so cute, and though neither recipient was particularly impressed with my craftiness (one being a baby, and the other being unimpressed by crafts in general), they would surface from time-to-time, as I dusted a bookshelf or organized a drawer, and they always made me happy. 

Since then, I've made a habit of coming up with valentines projects each year, including paper and fabric Valentines Cards, a woven valentine purse, and a quilted Valentine card. This year, I used some shantung silk scraps (though any scraps would do) to make a different style of fabric Valentine card based on the paper and fabric card from a few years ago. The white silk was left over from that time 15 years ago when I lost my mind and decided to sew my own wedding dress, and Valentines Day all these years later seemed like a good time to use them. The other pieces were bits of cotton and silk that I had left over from various projects. Here are the step-by-step instructions if you want to try it yourself. 

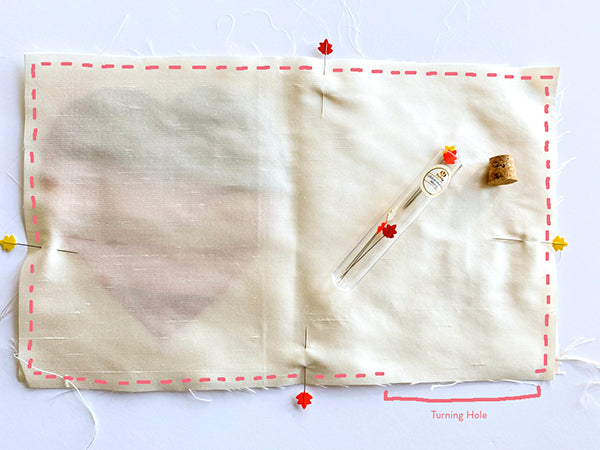
Step 1: Determine the size of your card, and cut out 2-3 rectangles of a neutral or light-colored fabric that will serve as the ground. You will want to double the width of your card (as it will be folded) and allow for a 1/4-1/2" seam allowance when you make your measurements. I wanted my card to be 5.5"x7" finished, so I cut 2 pieces at 7 1/2"x11.5". I also knew my fabric was going to be fairly transparent, and I wanted the card to be opaque, so I cut a third piece that would be sandwiched between the outside and inside layers of the card like a quilt batting. You can also use craft interfacing for this, which will give it a stiffer feel. Stack the rectangles, matching the edges, and fold down the center, pressing to form a crease where the spine of the card will be. (This is just for heart and message placement later on.)

Step 2: Next, find a variety of scraps in a range of reds and pinks - or really whatever color scheme makes you happy. Arrange as desired, and piece together with right sides facing and a 1/4" seam allowance. I cut mine in irregular strips, a couple at slight diagonals for a scrappy, wonky look. Cut out a paper heart in the size you want for your card (giving at least 1/2" margin between the edge of the heart and the edges of the card) and check the sizing against your pieced strips so you can be sure that they will accommodate the size you want. You will need to allow for about 1/2" extra on all sides.

Scrappy Valentine Tutorial - step 2
Step 3: Pin your paper heart pattern to the pieced scraps and cut 1/2 inch from the heart's edge. 
Scrappy Valentine Tutorial - step 3
Step 4: Situate your heart face down on the inside left side of one of the fabric rectangles. If you want it to be centered, place it 1/4" closer to the center spine, as you will lose some of the outside edge to your seam allowance. Pin and stitch 1/4" inside the heart edge using thread that matches your ground fabric. I did one line of stitching on the back side of the heart first, then turned the fabric over and did another line of stitching on what would be the front of the card. 
Scrappy Valentine Tutorial - step 4
Step 5: Very carefully, using a small, sharp pair of snips or an exacto knife, make a small cut about 1/4" inside the stitch line, and continue to clip all the way around the heart. Be careful to cut only the top, neutral layer of fabric and not your pieced heart. Now the outside of your card is done!
Scrappy Valentine Tutorial - step 5
Step 6: On the right side of the inside layer, write your message. I chose to embroider mine, but you can use stamps, fabric pens, paint, more stitched fabric - whatever you like. However, make sure to test your medium out on a small scrap to make sure it will give you the desired effect.
Step 7: Once your message is complete, it's time to sew the layers. Place the  outside and inside layers together with right sides facing. Another way to say this is lay the outside of your card, with the pieced heart peeking through, face up on the table, and place the stitched or painted message layer face down on top, aligning edges. In my case, I placed the third batting layer on top of the other two (bottom image).
Scrappy Valentine Tutorial - step 7
Scrappy Valentine Tutorial - Step 7
Pin layers together. Beginning at the bottom middle edge, stitch the layers together with a 1/4" seam allowance, BUT stop 3 inches before the spot where you started, leaving yourself a good-sized turning hole. Backstitch. Clip the corners and trim the edges to neaten, leaving 1/8-1/4" seam allowance.
Scrappy Valentine Tutorial - step 7
Turn the layers right-side-out through the turning hole, and using a chopstick or other tool, press out the corners. Press your card flat, making sure to fold the edges of your turning hole under 1/4", so they are smooth with the rest of the card. On the outside of the card, topstitch over the outer edge, sealing up the turning hole, and continuing around the whole edge of the card. Fold the card in half, re-press the center seam and topstitch very close the the spine edge. 
And you're done!
Scrappy Valentine Tutorial - inside

Leave a comment

Please note, comments must be approved before they are published